


Т.к. больше всего я увлекаюсь полимерной глиной, буду публиковать тут различные мк. На компьютере у меня уже просто нет места, а тут удобно будет найти.
Итак, мастер класс от Kael Mijoy в технике миллефиори. Взят отсюда.
This cane is really easy! It would be great for a beginner. In fact, my 7 year old daughter is wanting to learn some flower canes- maybe I should teach her this one.
Anyway, only two colors involved and it only took be about an hour to make (including color mixing and working out the geometry of the thing).
So here it is:


Make it into a blended log with the white in the middle.

Reduce the log (see here for reducing info) and cut into 3 equal pieces.

Take one of the pieces, further reduce and cut into 4 equal logs. Cut 3 of these in half the long way. You will have one whole log and 6 halves.

Reshape the halves to fit around the whole. You will need to squish the corners toward one another a little to make them narrower and give the cut sides a little curve. Place the petals around the center. Set aside for a minute.

Take the other two logs from the original three, cut them in half the short way (for 4 logs) and cut them into thirds the long way. Stand the log up on your work surface and make a vertical cut straight down the cane.

Eyeball it a little to see where the next two cuts need to be made. Cut all four logs into thirds. You'll have 12 wedges.

Place six of the wedges in the grooves around the first row of petals. Press them on firmly.
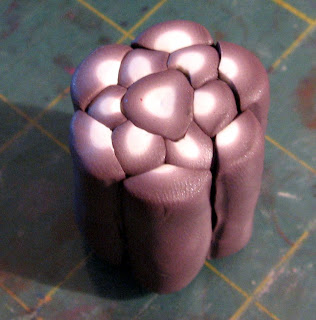 Now use the remaining 6 wedges for the outer row of petals. Use your fingers to pull and stretch each wedge to make it wider and thinner. Place them in the grooves around the flower.

Roll out several sheets of translucent clay and wrap the flower 4 or 5 times with it.

Trim the excess background so that the cane is round and not flower-shaped.

Enjoy!
Korrina
Итак, мастер класс от Kael Mijoy в технике миллефиори. Взят отсюда.
This cane is really easy! It would be great for a beginner. In fact, my 7 year old daughter is wanting to learn some flower canes- maybe I should teach her this one.
Anyway, only two colors involved and it only took be about an hour to make (including color mixing and working out the geometry of the thing).
So here it is:
Purple Flower Cane
(I really couldn't think of a more creative name for this one, sorry.)
equal amounts purple and white clay
translucent clay for background
Tools:
pasta machine or acrylic roller
tissue blade
Directions:
Make the purple and white clay into a skinner blend, starting with the shape shown below. For more info on making a skinner blend, see here.

Make it into a blended log with the white in the middle.

Reduce the log (see here for reducing info) and cut into 3 equal pieces.


Reshape the halves to fit around the whole. You will need to squish the corners toward one another a little to make them narrower and give the cut sides a little curve. Place the petals around the center. Set aside for a minute.

Take the other two logs from the original three, cut them in half the short way (for 4 logs) and cut them into thirds the long way. Stand the log up on your work surface and make a vertical cut straight down the cane.

Eyeball it a little to see where the next two cuts need to be made. Cut all four logs into thirds. You'll have 12 wedges.

Place six of the wedges in the grooves around the first row of petals. Press them on firmly.


Roll out several sheets of translucent clay and wrap the flower 4 or 5 times with it.

Trim the excess background so that the cane is round and not flower-shaped.

Reduce and trim the ends to see your finished cane!

Enjoy!
Korrina
Вот спасибо! Мечтаю когда-нибудь научиться работать с глиной, но пока только смотрю и наслаждаюсь)
ОтветитьУдалитьДа незачто) Буду тут потихоньку публиковать интересные мастер классы.
УдалитьА вы только начните, захватит с головой. Потом будете мечтать оторваться)
Если будут вопросы по полимерке - обращайтесь) с удовольствием помогу)
wow, it looks really beautiful!
ОтветитьУдалитьGreetings,
inga
Danke, Inga
УдалитьMir hat dieser tutorial auch gefaellt=)
Спасибо за МК , тоже мечтаю когда-нибудь попробовать ... ведь это как из ДЕТСТВА пластилин , просто пока проблематично купить , но всё впереди )))
ОтветитьУдалитьОй, пластика - моя страсть) Самая большая))) Позже выложу тут свои работы. Занимаюсь ей и вообще всем хэендмейдом полтора года и с огромными перерывами. Летом и январь - когда каникулы) А во время учебы только облизываюсь)
ОтветитьУдалитьПопробовать стоит обязательно)